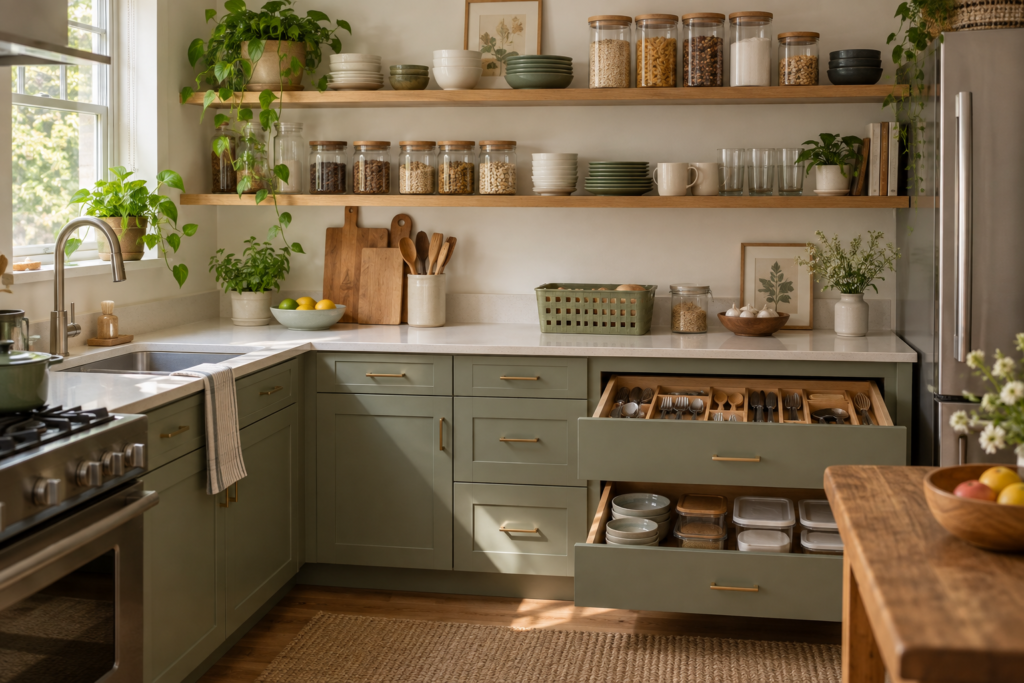
For food storage without a pantry, choose a suitable cupboard, drawer, or freestanding cabinet as the main home for shelf-stable food. Group ingredients by how you use them, keep opened packages visible, and give reserves a separate, limited area. Measure the shelves before buying bins, and decant only the foods that become easier to use in a different container.
You do not need a walk-in pantry to build a clear food-storage system. You need to know where a food belongs, how much room it needs, and what happens when the next grocery shop arrives. A small cupboard can work surprisingly well when it holds the foods you actually cook with. A large shelving unit can become confusing when every package has a different hiding place.
This setup guide focuses on the layout and daily routine. It explains how to choose a location, sort your existing food, measure containers, and create a refill process that does not rely on constant rearranging. The examples are planning exercises rather than claims about a tested kitchen or product. For related room projects, explore our kitchen and pantry organization guides.
Step 1: choose the food-storage location
Start by identifying the cupboards and drawers that could hold shelf-stable food. Do not assume that the emptiest space is the most suitable. Consider heat, moisture, access, and whether the food can be kept separate from cleaning products. Check the storage instructions on individual packages; some foods need refrigeration after opening even though you bought them from an unrefrigerated shelf.
The USDA’s shelf-stable food guidance advises a cool, dry location and warns against storage beside or above a stove, under a sink, or in places exposed to temperature extremes. Use those conditions to rule out unsuitable spots before comparing furniture. A decorative basket does not correct a damp or overly hot location.
Choose one primary location and one optional reserve area
Keep the food you reach for during normal cooking in one main area where possible. This might be two cupboard shelves rather than an entire piece of furniture. A secondary location can hold suitable unopened reserves, but give it a defined purpose. When packets are scattered across four cupboards without a rule, shopping becomes a memory test and partially used ingredients are easy to overlook.
Walk through a typical meal. Where do you stand to prepare breakfast? Where do you look for rice, pasta, or a tin of tomatoes? Select a location that reduces unnecessary walking without placing food too close to heat or water. Accessibility is personal: a high cupboard may be convenient for one adult and impractical for another person who cannot reach it comfortably.
Keep the cleaning cabinet separate
Do not solve a crowded food cupboard by moving packets beneath the sink. Set up cleaning supplies as their own system using the under-sink storage guide. This separation also clarifies what each cupboard is for: groceries enter the food area, while cleaning tools and appropriate household supplies return to their designated location.
Step 2: sort the food before choosing organizers
Clear one shelf at a time onto a clean surface so the project remains manageable. Group duplicate items together. You may discover that the cupboard feels full because several partly used packets occupy different corners. Check package condition and follow the relevant label and local food-safety guidance for any item whose storage history is uncertain. Do not make food-safety decisions from appearance alone.
Create four working groups: opened ingredients, unopened ingredients used regularly, occasional ingredients, and items requiring a decision. The last group should not become a permanent miscellaneous box. Decide whether an ingredient belongs in an upcoming meal, needs a different storage location under its instructions, or should be handled according to appropriate disposal guidance.
Record package size as well as quantity
A list that says “rice, cereal, flour” is less useful for planning than one that includes the actual pack sizes you buy. A household using small bags weekly needs different storage from one buying large sacks. Keep several representative packages nearby while you measure. Containers should accommodate your real shopping pattern, not a standard collection pictured on a retailer’s shelf.
Also notice changes in usage. A baking ingredient bought for one holiday does not necessarily deserve the same accessible shelf space as breakfast oats used every morning. Frequency can change through the year. Give occasional supplies a clear but less prominent zone so everyday cooking does not require moving them out of the way.
Step 3: measure the usable shelf space
Measure the inside width, depth, and clear height of each shelf. Include hinges, shelf supports, and the frame around the cupboard opening. A bin can fit on the shelf yet fail to pass through the opening without being tilted. If it will hold loose packets or jars, that tilt may make removal inconvenient or unstable.
For a drawer, measure the internal height with attention to the space beneath the structure above it. Tall lids, handles, and pour spouts count. A package standing upright in an open drawer may catch when the drawer closes. Use the actual tallest item to test the clearance before selecting a row of matching containers.
Example: planning a 56 cm shelf
Suppose a shelf has 56 cm of usable width and you are comparing bins that are 18 cm wide at their widest point. Three bins total 54 cm, leaving 2 cm across the whole row. That arithmetic does not prove they will work: handles may need extra space, the door frame may narrow the exit, and the bins may be awkward to grasp when packed tightly.
Compare two bins plus a separate open zone instead. That arrangement might accommodate breakfast packets in one bin, baking supplies in another, and tall bottles in the remaining space. These dimensions are illustrative, not a specification to copy. The useful exercise is to draw each footprint and test the action of taking it out, rather than calculating storage capacity alone.
Use temporary outlines before spending
Mark proposed container footprints on paper and place them on the empty shelf. Use existing suitable containers to test the grouping where possible. Paper outlines reveal clashes but do not demonstrate load capacity or ease of carrying, so follow them with a trial using the real items. Keep the door opening and the space in front of the cupboard part of the plan.
Step 4: build zones around meals and routines
Breakfast zone
Group the shelf-stable foods regularly used together for breakfast, such as oats, cereal, or unopened spreads where their labels permit. A small bin can gather flexible packets; large cereal boxes may work better standing directly on the shelf. Keep the front clear enough to see what is open. The goal is to assemble breakfast without searching several different places.
If family members choose different breakfasts, avoid forcing everything into one oversized basket. Two modest groups may be easier to manage. Position suitable snacks or breakfast items according to who needs independent access, while considering allergies and household requirements. Organization should support the existing food rules rather than replace them.
Cooking staples zone
Keep regularly used dry staples and appropriate unopened cooking ingredients together. Arrange them so labels are visible and one item can be removed without dismantling a stack. A shallow row of tins may be clearer than several deep rows. If the shelf is deep, a removable bin can collect smaller packages, but check that its loaded weight remains manageable.
Do not combine every cooking item into one category simply because it is used at dinner. Tall bottles, flat packets, and heavy tins have different handling needs. You can keep them in adjacent zones while using different storage formats. A workable system often mixes direct shelf storage with one or two targeted organizers.
Baking and occasional ingredients zone
A labelled baking bin can make it easier to retrieve several small ingredients together. Keep original information available, particularly where ingredients have similar appearances or specific instructions. If you bake rarely, a less accessible shelf may be appropriate provided you can retrieve the supplies safely. Avoid putting a heavy, overfilled bin above a comfortable lifting height.
Distinguish equipment from ingredients if mixing them makes access worse. Measuring tools might belong in a nearby drawer while baking ingredients stay together on the shelf. You do not have to store everything for an activity inside one container; the meaningful connection can be location and labelling rather than physical enclosure.
Reserves zone
Give unopened extras a bounded space. Keep that zone separate enough to avoid opening duplicates but visible enough to check before shopping. Label it “reserves” rather than “miscellaneous.” If a large purchase exceeds its capacity, decide where it will live before bringing it home instead of allowing overflow to spread across counters and unrelated cupboards.
Step 5: choose storage tools selectively
| Tool | Good use | Potential drawback | Key buying check |
|---|---|---|---|
| Open bin | Collecting packaged snacks or baking ingredients | Can hide items if too deep or opaque | Outer dimensions and comfortable loaded weight |
| Food-storage container | Ingredients whose original packaging is awkward | Requires transferring, cleaning, and labelling | Food-contact suitability, closure, actual usable capacity |
| Shelf riser | Making a second visible level for short items | Reduces clearance and can complicate removal | Platform height, stability, rated load |
| Drawer divider | Stopping packets shifting in a deep drawer | Uses part of the drawer width | Drawer dimensions and secure fit |
| Freestanding cabinet | Adding a defined food-storage location | Consumes floor area and needs installation planning | Door clearance, stability, manufacturer anchoring instructions |
Do not decant everything automatically
Decanting is useful when it solves a specific problem: a bag will not stand, a closure is inconvenient, or a container makes pouring easier. It also creates work. Someone must transfer the food, retain necessary information, clean the container appropriately, and manage the remainder when a new package does not fit. Original packaging inside a simple bin may be the better arrangement.
If you transfer food, use containers intended for that food-storage purpose and follow the care instructions. Retain ingredient, allergen, preparation, date, and product-identification information from the packaging. Label the container clearly, including information needed to distinguish similar ingredients. Do not assume that the same appearance means the contents can be combined.
Match volume to the real ingredient
A container’s litre capacity describes volume; a bag’s kilogram label describes mass. They are not interchangeable. Different ingredients occupy different volumes for the same mass, so a two-litre container does not automatically hold a two-kilogram package. Check ingredient-specific capacity information from the manufacturer when available, or test an appropriate existing container before committing to a set.
Leave enough practical room to use the closure and scoop or pour as intended. Filling to the brim may interfere with a lid or make normal use messy. If your preferred package always leaves a small remainder outside the container, consider a different container size or leave that ingredient in its original packaging instead of creating an awkward second storage location.
Step 6: create a repeatable restocking routine
Before shopping, check the opened-food zone and the reserve zone. Write the list from what is actually missing rather than what you remember seeing last week. A simple note on your phone or cupboard door is enough. Avoid creating a detailed inventory spreadsheet if nobody in the household will update it after taking out a packet.
After shopping, put new suitable reserves behind the items you intend to use first, while respecting dates and package instructions. Keep opened packets easy to identify. Do not top up containers continuously without tracking what remains inside; use a deliberate emptying and cleaning routine appropriate to the container and food before refilling.
Test the system through one complete shopping cycle. The cupboard must hold both the nearly empty state before shopping and the fuller state afterwards. If a layout works only when you have almost no food left, its capacity does not match your routine. Adjust the buying quantity, the location, or the storage method rather than repeatedly stacking items into inaccessible gaps.
Adapt the setup to your household
For one person in a studio
Start with a compact daily-food shelf and keep occasional ingredients limited to what you use. A large container set can occupy more room than the original packets. Prioritize visibility and flexible grouping, especially when a cupboard also serves several kitchen functions. A small open bin for loose packages may solve more than an additional piece of furniture.
For a family sharing a small kitchen
Use labels that everyone understands and separate daily access from reserve stock. Keep the system simple enough for another person to put groceries away correctly. If the only person who understands the arrangement is the person who designed it, the layout will depend on constant supervision. Test a label by asking where someone would put a new packet without coaching them.
For renters using freestanding storage
Measure the furniture footprint and the space its doors or drawers need to open. Keep circulation routes usable and follow installation and anti-tip instructions. Check tenancy restrictions before any required fixing. A narrow cabinet that fits a gap still needs a suitable location for food, so do not let a convenient footprint override heat and moisture considerations.
Common setup mistakes to avoid
Buying containers before sorting: this turns the organizer into the starting constraint. Sort and measure first so you can choose only the pieces with a clear role. Using the deepest shelf for everything: items at the back disappear; give deep areas removable groups or appropriate reserves instead of loose unrelated packets.
Labelling too narrowly: a container named after one brand may become confusing when the next shop changes. Use a clear food category where appropriate while retaining exact ingredient information on transferred food. Ignoring the refill step: if returning groceries requires emptying the entire shelf, simplify the layout before adding another level.
Questions about food storage without a pantry
Can a kitchen drawer replace a pantry?
A suitable drawer can hold shelf-stable foods when the location meets their storage instructions and the drawer can support the load. Measure its interior and closing clearance, group small packets so they remain visible, and label the tops of suitable containers when you view them from above. Keep heavy loads within the furniture’s rated capacity.
Is it better to use clear or opaque bins?
Clear bins make it easier to see packaged contents from the front. Opaque bins can still work with clear labels and shallow, well-defined groups. Choose based on visibility, access, and the food’s storage needs rather than appearance alone. Neither style replaces a suitable environment or the packaging required for a particular food.
Do I need airtight containers for all pantry foods?
No single container rule applies to every food. Follow its package instructions and use an appropriate closure after opening. Decant only when a suitable food-storage container improves handling or storage. An airtight claim does not mean that a food can ignore its refrigeration requirements, dates, or other directions.
Where should bulk purchases go?
Use a suitable designated reserve location with enough capacity, then keep a manageable working quantity in the main food area. Preserve the necessary packaging information and instructions. If no suitable reserve space exists, a smaller purchasing quantity may fit your household better than adding overflow baskets throughout the kitchen.
How often should I reorganize the cupboard?
Check it during your normal shopping and restocking cycle. A complete rearrangement should not be necessary every week. If the same item repeatedly lands elsewhere, change its assigned position or storage format. Adjusting one awkward zone is usually easier to maintain than rebuilding the entire cupboard each time.